Checklists
These are listed in order of game appearance.
For visual support, refer to this video: http://www.youtube.com/watch?v=zaenLrJM0yk
Achievements

|
An eye for an eye |

|
Sherlock Holmes
|

|
King's Quest
|

|
RPG much? |

|
No more trolling |
Magicks

|
I put on my robe and wizard hat
|
Items
- Staves
- Basic Staff (None) - Starting weapon obtained in the tutorial
- Staff +1 (Increases all spell damage by 1) - This item replaces the Basic Staff if you own the Wizard Hat DLC and use the special "hatted wizard" character model
- Staff of Life (Regeneration Aura/Revive) - North of the woman with an exclamation point above her head, between the gate and garden plot
- Staff of the White Wizard (+1 light radius/Fear) - In the chest behind the wooden door to your left as you leave the castle.
- Weapons
- Blunt Blade (Low Physical) - Starting weapon obtained in the tutorial
- Sharp Blade (Medium Physical) - This item replaces the Blunt Blade if you own the Wizard Hat DLC and use the special "hatted wizard" character model
- Excalibur (Medium Physical/Slow, Knockdown) - See Sherlock Holmes 3/14 above.
- Captain's Axe (Medium Physical) - Given to you by Captain Bjorn after defeating the troll or dropped by Bjorn if he dies.
Monsters and Bosses
- Imp
- Behold the Watcher (Boss)
- Goblin Rogue
- Giant Spider
- Ygg, Hungry Forest Troll (Boss)
Chapter Story
Chapter 1 - The Fancy Menace
Stay a while and listen, and I will tell you a story. A story of Dungeons and Dragons, of Orcs and Goblins, of Ghouls and Ghosts, of Kings and Quests, but most importantly -- of Wizards and Vamp -- Well... A story of Wizards.
- Once upon a time, in a land known as Midgård...
- There lived a powerful Wizard named Grimnir, who sought to harness the power of all Magicks -- ancient spells, crafted in times long forgotten. With such knowledge he might enable the wizards of the Order of Magick to spread eternal peace across the lands...
- But the Order of Magick instead felt threatened by his ambitions, and in the shadows they schemed, and devised a treacherous plan...
- ...and so, Grimir's disciples were expelled from the Order, and he himself was, for all time, imprisoned at World's End. All because of his dangerous lust for knowledge.
- Grimnir's dangerous ambitions dashed, the world was safe once more... Aside from the increased number of monsters attacking the good villagers.
- And of course, the warlord Khan, who had united the orc tribes, and now threatened the great city of Havindr.
But in the dusty gloom of Castle Aldrheim, where the Order of Magick dwelled, a brilliant teacher and his finest pupils were about to embark on a journey that would prevent the world from changing... ... Forever...
Note that "Grimir" is indeed misspelled in the Chapter 1 story text in the game.
Area 1
The story of Magicka as told starts you off in Vlad's classroom in Castle Aldrheim. Vlad introduces himself as the senior tutor of the Order of Magick, and informs you that he is not a vampire despite looking like one. You have been chosen by the university to travel to the city of Havindr to aid The King as they are under attacks from the Orc clans. He quickly summarizes the situation and reiterates that he is not a vampire.
Walk around the room, try to get used to the movement controls, examine objects such as the cute SCRUM board behind Vlad, talk to him and otherwise exit the boring classroom. If you talk to the wizard in the hallway looking at a picture of Vlad, he also thought Vlad was a vampire, but he is clearly mistaken. As you reach the central hallway, another wizard tells you that there is a farewell party being thrown downstairs just for you. How nice!
You can explore the castle if you like. Once you are done, head southeast towards the stairs and a cutscene will occur.
Area 2
Shams greets you cheerfully downstairs that Baleyg has gone to get more cheese for the party. Propp appears and decides to cast some fireworks...
Area 3
... with the disastrous results of breaking the floor beneath you. Falling into the dungeon of the castle, the wizards above board up the gaping hole and tell you to find your way out of the dungeons. Oh, and the safe word is BANANA!

Follow the tutorial instructions and gather up the Elements. Pick up the Haste Magick and use it to get past the masher. Do so by casting Haste and start running across the hallway just as the masher is retreating back towards the wall. You will next enter a cave leading to the east with Imps in it. They're easy prey, and the first time you'll have to fight, no reason to be on guard prior to this. Past the Imps, there is a room with a lever near the southeastern wall. Pull the lever to enter what is technically your first Boss Battle! Before you enter the room though, read the wooden panel next to the door for a tip.
|
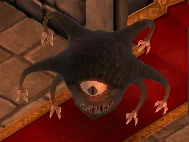
Behold the Watcher
Behold the Watcher is a Benign Beholder (you really don't want to meet a Malignant Beholder yet) and looks like a nasty one-eyed monster with many hands. It only has one attack and that is to shoot you with several red Arcane beams that deal 60 damage per volley. You should try one of two things:
Practically any beam combination works on him, as he will not use any of his attacks when being hit by a beam. Also, Behold will not attack you until you have attacked it first. Killing Behold will complete the "An eye for an eye" achievement. | ||||||||||||||||
Head up the stairs to leave the dungeons back to join the "Save the World!" party.
Area 2
Arriving back at the place just before you fell into the dungeons, (you will jump here if you opted to skip the tutorial dungeon and Shams will teach you the Haste Magick), Shams will automatically teach you the Revive Magick. He will also teach you the Meteor Shower Magick if you have the bonus Wizard Hat DLC. You also learn that Behold was the Order's pet watcher. Awwwww...
Talk to the wizards, and the one in the middle of the room will tell you that if you mix the Water and Cold elements together, you get the Ice derived element (![]() +
+ ![]() =
= ![]() ). He hasn't figured out how to make Steam yet but this one is easy, you just combine Water with Fire together (
). He hasn't figured out how to make Steam yet but this one is easy, you just combine Water with Fire together (![]() +
+ ![]() =
= ![]() ).
).
You can kill everyone at the party if you like; friendly non-player characters (also called NPCs) will never attack you back in this game. Leave the castle by heading south.
Area 4
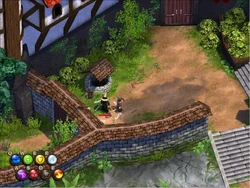
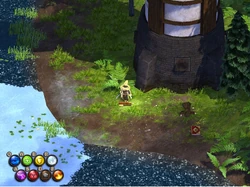
Once you leave, you'll see a man to the left in front of a breakable door (see Image 1). Use a charged up earth projectile (![]()
![]()
![]() +hold right mouse button) or a beam to knock it down and open the chest behind it to get the Staff of the White Wizard. This is also the first secret area of 14 in the game. If you find all 14, you will complete the Sherlock Holmes achievement.
+hold right mouse button) or a beam to knock it down and open the chest behind it to get the Staff of the White Wizard. This is also the first secret area of 14 in the game. If you find all 14, you will complete the Sherlock Holmes achievement.
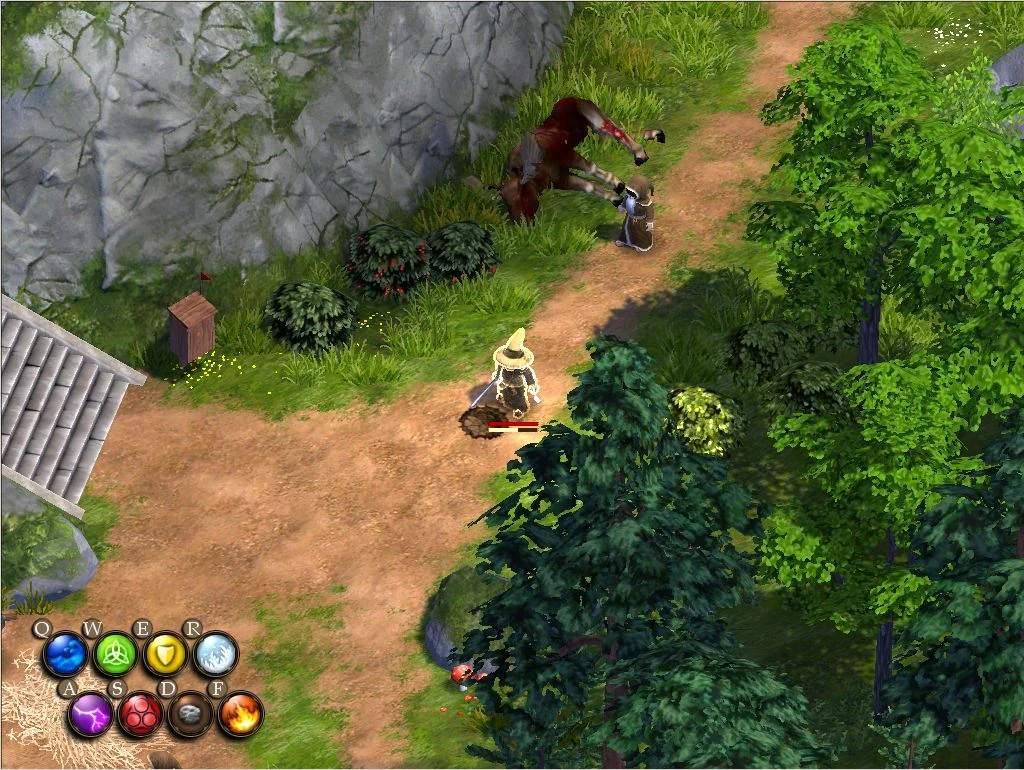
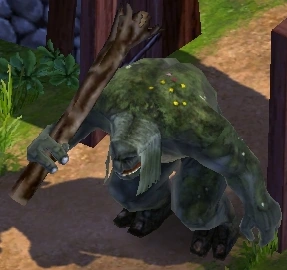
Continue down the stairs and follow the path north, you'll come across your first dead moose for the King's Quest achievement - the game even stops at a cutscene for you. How convenient! Be sure to examine the moose (see Image 2) to get the achievement credit.
As you leave the corpse of the moose and go north, you will hear an explosion sound in the distance. What has happened? To find out, freeze (![]()
![]()
![]()
![]()
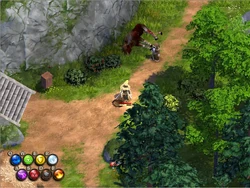
![]() +Shift+Right click) the lake to your right repeatedly and cross the frozen surface to the other side to get the Grease Magick (see Image 3). This is also secret #2. Examine the body lying next to the spellbook and you will recognize that it is Baleyg who had been looking for cheese for you. Apparently, something happened to the tower upstairs as its top is completely blown apart and it is still smoking (that was the explosion you heard). You cannot do anything for Baleyg so head back across the frozen lake to the main path and follow it north. Magicking is dangerous business.
+Shift+Right click) the lake to your right repeatedly and cross the frozen surface to the other side to get the Grease Magick (see Image 3). This is also secret #2. Examine the body lying next to the spellbook and you will recognize that it is Baleyg who had been looking for cheese for you. Apparently, something happened to the tower upstairs as its top is completely blown apart and it is still smoking (that was the explosion you heard). You cannot do anything for Baleyg so head back across the frozen lake to the main path and follow it north. Magicking is dangerous business.
When you get to the broken bridge, you will notice another spellbook high up on the castle walkways. You cannot reach it at this point in the game, so just freeze the water between the broken bridge and continue northwards. (If you are in a multiplayer game, you can grab the Teleport Magick by doing the Mine Trick (See the Magicks page on details and a video link). It's fairly difficult and you'll likely just end up dying. The Magick isn't meant to be obtainable at this point in the game.)
Right after the bridge, if you are sharp-eyed, you will find a soldier in blue half obscured by some bushes on the left. He tells you that someone in a black cloak just bit him and that he's staying there to recover from his shock. Hmmm... who could have done that? If you talk to him again, he'll ask you to tell Captain Bjorn that he'll be late.
Activate the checkpoint and continue north to the next area.
  1. Sherlock Holmes 1, Staff of the White Wizard |
  2. The first dead moose |
  3. Sherlock Holmes 2, Grease Magick |
Area 5
Head west into the fenced farm area. Approach the woman with the exclamation point above her head to start a cutscene. 3 Goblin Rogues will come from the north yelling "RAKANISHLOL!" (Diablo 2 much??). Time for combat! Be very careful not to kill the woman accidentally, heal her if necessary with a healing beam (![]() +right click). After defeating them, talk to the woman again to complete the achievement "RPG much?". If you mess up and the woman dies, you can suicide (cast an element at yourself with middle click that isn't Life or Shield) and restart from the previous checkpoint in Area 4 (you did activate it didn't you?).
+right click). After defeating them, talk to the woman again to complete the achievement "RPG much?". If you mess up and the woman dies, you can suicide (cast an element at yourself with middle click that isn't Life or Shield) and restart from the previous checkpoint in Area 4 (you did activate it didn't you?).
Just north of the woman along the wooden fence, there is a Staff of Life. Press Tab to see what it does. This staff gives you a regeneration aura that heals you for 64 hitpoints per tick, allowing you to concentrate more on killing enemies in combat. However, do note that the aura (the radius is visible on the ground around you) affects BOTH friends and enemies near you. Most of the time, this isn't an issue since your damage output is so massive anyway and you kill most enemies before they even reach you.
The staff also has an active ability which is the Revive Magick you already learnt earlier from Shams. To cast it, you simply aim and middle click with no Elements queued up in the spellbar. The staff's active ability has a cooldown, so you can't chain cast it like you could with ![]()
![]() +spacebar. Future staves may offer you abilities and Magicks that you do not know yet.
+spacebar. Future staves may offer you abilities and Magicks that you do not know yet.
You can only hold one staff and one weapon at any one time so anytime you pick up a new one, the existing one drops to the floor. The Basic Staff from the tutorial is an exception since it has no abilities and the game just eats it into the void.
Now head west and open the wooden gate (isn't it interesting that you can't destroy it like you could with the first secret door earlier?) and walk through the wheat field to find secret #3 and Excalibur! The famous sword in the stone... complete with stone! Shift+Left click to swing it and see how ridiculous it looks. It does have the ability to slow and knockdown any enemy it hits though.
Backtrack to the farm and continue north. A short cutscene starts showing 2 Goblin Rogues being ambushed by 3 Giant Spiders! Continue north into the clearing and the 3 spiders will "ambush" you. If you are using the Staff of Life, you are pretty much unkillable since the healing is more than the combined damage of the spiders. Kill them all with an area attack spell such as ![]()
![]()
![]()
![]()
![]() +Shift+Right click.
+Shift+Right click.
Eventually you'll come to a small camp with a wooden wall. Two soldiers outside talk idly about a Forest Troll. Get ready for your first REAL Boss Battle!
|
Ygg, Hungry Forest Troll
Ygg, the aforementioned Forest Troll comes charging into the camp. It is large and carries a large wooden tree trunk. It moves relatively slowly, especially if it is slowed with the Cold element. It regenerates hitpoints all the time but this can be stopped by setting it on fire. It does three types of attacks.
There are 2 main methods of killing Ygg:
There are 2 possible outcomes to the battle (that doesn't involve you dying):
Killing Ygg will complete the "No more trolling" achievement. | ||||||||||||||||
Head northeast and continue to the next level.
| |||||||||||